IT, Android One and BYOD

Carrier-Vendor-Android-IT-Stack
11 Jun

BYOD (Bring Your Own Device) is now a paradigm that is tightly integrated into IT spectrum. IMO, Android One helps simplify the life of IT staff while handling user owned devices that operate on data that is owned by the organizations.

The IT staff’s ownership over the client devices/end points is reducing very fast in recent years. This is due to the use cases that focus on end users,  service providers, partners and internal employees that are continuously contributing to the data of an organization. Despite reducing level of ownership of these devices, the IT staff continue to have a responsibility to prove that they have adequate controls over these devices and their data.

For example, signatures of customers and delivery details on delivery personnel’s client devices should be ascertained with to all the integrity and confidentiality controls by IT staff of any shopping website and its delivery partners. There were times when the client devices are custom made solutions for the delivery companies, but smart phones are rapidly replacing these legacy client devices. More often than not, these smart phones are owned and updated by individuals rather than organizations. Hence these BYOD devices pose a challenge to the IT staff and increase threat to the data confidentiality and integrity.

The major challenge for IT staff is to ensure that all the nomadic client devices are running approved, stable and latest stack. In olden days (say about 10 years ago), the client devices are mostly laptops that need to be patched and upgraded regularly, along with appropriate user access controls on these devices. With the proliferation of smart phones as client devices, the challenge goes multi-fold. Wearing an IT Professional’s hat, I do see every smart phone like this:

Android One: Carrier-Ventor-Android-Stack

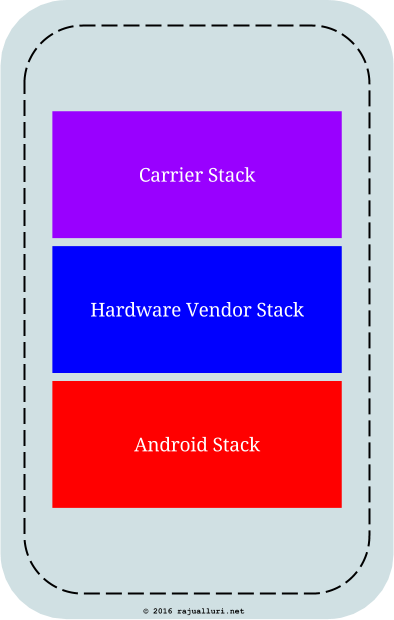
The moment I think about manageability of that smart phone (not ownership of the smart phone, which is never going to happen), I see the smart phone as

Android One: Carrier-Vendor-Android-IT-Stack

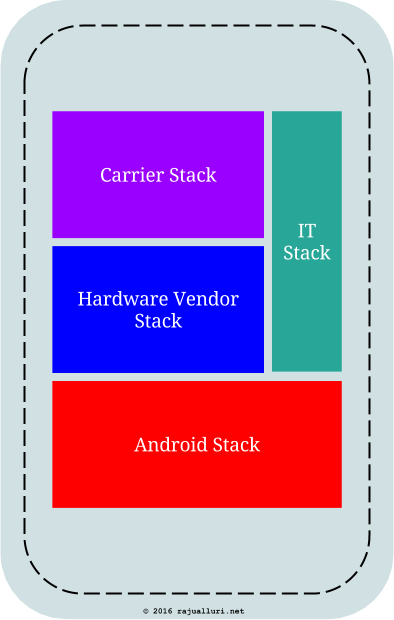
The IT stack in the above picture is a combination of various off-the-shelf and home grown applications, together with well tested configurations of these applications. More often than not, the IT stack applications and configurations heavily depend on the underlying Android Stack. That means it pays to support these applications and configurations on a limited set of latest versions of Android.

When it comes to the upgrades (read patching) of the Android stack, both the carrier and vendor have long release cycles in place for stack upgrades on target devices. As a result, most smart phones that are more than a year old end up running Android versions that are old and probably not patched fast enough. This is true with any mobile OS though, not just with Android.

Supporting the IT Stack in the above picture is a nightmare for IT staff if they are to support this on multiple and older versions of mobile operating systems. Due to this, the IT staff may want the mobile phones to run with the latest OS. But the large release cycles of phone vendors and carriers often become a hurdle to accomplish this.

Android One (https://www.android.com/one/) is the best solution out of that version control mess. I have been using a cost effective and reasonably powered Android One phone since 2014. Over the last year and half, this phone has become my device of choice for use cases that strictly require latest versions of Android Platform and its eco system. The use cases include IT tools like VPN connectivity apps, single sign-on solutions, device control/erase solutions, messaging solutions and sharing solutions. This $100 unlocked dual SIM phone is a very reasonable investment for accomplishing adherence to stringent IT policies.

Android One is supported by phones that are very high end (e.g. the Nexus series sold directly by Google) all the way to cost effective phones in emerging economies. In almost all cases, the phones come with unlocked versions, leaving a wider choice of carriers to customers.

Updates to my Android One smartphone have been regular and painless in the last year and half. The ability to grab the latest update of Android within a few hours makes Android One my preferred choice.

In any BYOD centered IT infrastructure, Android One is the best way to go for IT staff to enforce tighter IT policies on smart phones while ensuring that the user devices are running with latest version of the mobile stack. That in turn ensures that the IT stack on the smartphone is current and easy to manage.

libressl

04 Nov

Libressl (http://www.libressl.org/) is a recent fork of OpenSSL. The goal of libressl is to provide a more secure alternative to openssl and the developers who forked the code feel that openssl is beyond repair at this point. Quoting from libressl website,

LibreSSL is a version of the TLS/crypto stack forked from OpenSSL in 2014, with goals of modernizing the codebase, improving security, and applying best practice development processes.

The best documentation of libressl features (or default configurations) can be found in the release notes from 5.6 version of OpenBSD. Looking at the list, this is an impressive push towards securing the implementation by default. Without worrying too much about the backward compatibility, some of the lesser secure configurations and protocols are simply left out from the implementation.

By dropping support for a bunch of hardware engines and platforms, libressl probably has less things to worry about. For example, dropping support for big-endian i386 and amd64 systems liberates it a bit. With classic adopters of big-endian architectures evenutally becoming bi-endian, there is not much to lose here, in my opinion. However, reusing the standard C library routines like malloc() and snprintf() could take an interesting turn. Dropping kerberos support is interesting too – don’t we still have a lot of academic community working on it?

I like changes like dropping SSLv2 support and stopping the use of current time as random seed among a few others.

There are several discussions in the past on which of these opensource SSL implementations are better. Being a legacy implementation, OpenSSL at this time requires a considerable set of configurations to make it secure. From that view point, libressl might look better in terms of its out of the box readiness for a more secure implementation. However, in the world of automated deployments and continuous integrations, recipes exist to configure openssl to avoid less secure protocols and algorithms.

I am not sure at this point whether libressl will surpass openssl in future in terms of adoption, but sure I am glad to see a drive towards being “more secure by default.”


More from openssl last week

09 Jun

The heartbleed bug might have created pressure schedules for many a system administrators and security practitioners around the globe, but it definitely has done a few good things. One great outcome of heartbleed is closer scrutiny of the openssl code and use cases, that is going to help the secure online activities in the long run.

Last week, openssl released a few more patches and people jumped on it right away. The issues involved are not as serious as heartbleed (actually, no where closer), but the attention these patches have got is good.

Broadly, there are two major vulnerabilities that are of interest to me from that set.

  • SSL/TLS MITM vulnerability (CVE-2014-0224): The vulnerability requires both client and server to be running vulnerable versions of openssl, so this was relatively easy to fix. This vulnerability exploits the weakness in ChangeCipherSpec phase of the SSL handshake and that is a small, but practical window of opportunity for the attacker. Also, connectionless services are impacted to a greater level (say, streaming) than connection oriented services. That made this particular vulnerability a very important one to fix, but not a super critical one from a timeline standpoint.
  • SSL_MODE_RELEASE_BUFFERS NULL pointer dereference (CVE-2014-0198): This vulnerability would cause potential injection into a stream and would lead to DOS attacks. Luckily, none of the key sites I work with are using this flag explicitly set on apache and nginx based servers.

Rest of the vulnerabilities are not so critical for the kind of environments I work on. However, patching in either of the above cases would lead to well patched servers for all these vulnerabilities.

So it was a good week/weekend that involved verify and patch than rush and fix.


Enterprises And OpenStack

01 Jan

A technology might show lot of potential, but its commercial success in certain market segments is driven by a varied set of factors. Take OpenStack, the technology that comes to mind when we talk about private clouds, for example. The technology has all the right ideas for it to be the primary choice of implementation for any private cloud. However, its proliferation into enterprises with private cloud needs/implementations is still not up to the mark.

In this Gartner Blog Network article (that is almost a couple of months old), Alessandro Perilli discusses various factors that are deterring OpenStack from being at a place where it should be in enterprises. Beyond the views of Alessandro, one of the comments summarizes the challenges for OpenStack Governance Board – not having a firm say in limiting the features (and scope) and eventually trying to chew too many features. Right from the day the article is published, there is a good amount of discussion for/against the views expressed in the article. One resounding agreement across the fences is that OpenStack still has lot of potential for commercial success in enterprises. People at large enterprises might love the OpenStack technology, but never get to the level of advocating strongly for making it the first choice.

The year ahead is going to be an interesting time for private cloud implementations. Hope OpenStack uses this year to the fullest potential and makes itself a widely implemented solution within large enterprises.


First bake of your Raspberry Pi

22 Sep

Introduction

This is a short tutorial on how to bring up your Raspberry Pi for the first time and make it run something simple and fun.

In order to know that we accomplished what we want to, lets set the goal first. At the end of this short tutorial, we should be able to

  • Boot Raspberry Pi using an OS image (server grade, not desktop grade)
  • Run a webserver and a light blogging software on Raspberry Pi
  • Run a few automated scripts that collects a few simple statistics on the system and present this information as regular blog post

What we need

In order to accomplish our simple goal, we need the following bill of materials

  • Wiring and powering
    • Raspberry Pi device
    • A MicroUSB power supply (The minimum recommended power is 700mA at 5v. Most of the current day devices should support that. I personally use one of the power supplies that came with either of these devices – HTC Android phone, Asus Nexus 7 Android tablet or LG Nexus 4 Andriod phone. In a nutshell – you may not have to buy a power supply, you can use a redundant one that is eating dust around.)
    • A HDMI-HDMI cable (I run my Raspberry Pi without a monitor. I temporarily connect it to my TV during first builds, to do any inital configuration. Rest of the time, I connect to the device using SSH sessions from other computers.)
    • A USB keyboard. Please use a very basic keyboard that doesn’t draw too much power. Finding one should be fairly easy.
    • A class-4 or better SD Card of size 4GB or more.
    • A network cable
  • Display and connectivity
    • A monitor or TV that can take HDMI input. If you have a monitor that supports DVI only, you may have to use a HDMI-DVI cable instead.
    • A router or switch port on your home or office network to connect the Raspberry Pi to. I recommend a DHCP enabled network port for ease of use
    • A computer with network connection and SD card slot to download the OS and build your SD card.

Getting to know your Pi

At this time, I strongly recommend going thru this quick start guide, so that you are familiar with the device’s ports and connections.

Installing the OS on SD Card

I would normally do it the old fashioned way – by downloading the Raspbian Wheezy OS image and keeping it for multiple installations. I use my Mac or Linux system to prepare the SD Card and dumping the OS image using dd command. You need to be very careful and shouldn’t overwrite the primary hard disk on your system while taking this approach.

If you prefer to do interactive installations, download NOOB software from here. The NOOB software is interactive and offers you a few choices while guiding thru the installation process.

The rest of the tutorial is based on Raspbian Wheezy OS. If you prefer to install any other OS, the instructions might slightly change.

Booting the Pi

  • Connect the HDMI cable to monitor or TV
  • Insert the USB keybaord into one of the USB ports
  • Insert the network cable and connect the other end to the switch port or router.
  • As a last step, insert the micro USB power supply. Note that there is no additional power switch to Pi. Once you insert the power cable, it starts booting.

Once the system boots to a login prompt, login with the default username and password ( pi / raspberry ). Check if you are connected to Internet. If you see any issues, you might want to refer to the Raspberry Pi Forum.

Scenario

Here is a very simple scenario we are envisioning to accomplish on this Raspberry Pi.

There are three users setup on the system: boat, pi and tiger. The boat user is the one that collects the metrics and reports. The metrics collected are:

  • How long the system is up, how many users are currently on the system and the load on the system
  • How many pi users are on the system
  • How many tiger users are on the system

The metrics are collected by the boat users once in about 10 minutes and each collection is reported as a blog post.

Additional Software

For accomplishing our scenario, we need

  • A webserver running on the system: Let us use Apache as our webserver. If you prefer, there are other choices like Nginx or Lightttpd. However, this tutorial covers only apache2
  • A blogging software: Blosxom is one of the simplest blogging software around. It works on flat files (no DB installation required) and the blogging process is very simple – add a new post in the form of a new file that has the text either in text or HTML format.

Blosxom works by reading files in a given directory and displaying those files as a blog. Each file is treated as a separate blog entry. The first line of the file is treated as title of the blog post. The timestamp of the file is attributed to the blog post as publish time.

This approach of Blosxom fits our bill – periodically check a few metrics on the system and report these metrics. All we need to do is to collect all the metrics in one file and the file gets displayed as a blog post by Blosxom.

Updating/Installing the packages

It is a good practice to update the lists and upgrade the packages. Use the following commands to udpate the packge lists and then upgrade the packages.

sudo apt-get update
sudo apt-get upgrade

Once you are done, your Raspberry Pi should be running the latest version of the packages installed on the system. Now, I would recommend installing Apache webserver.

sudo apt-get install apache2

Once you install apache2, make sure that you have Apache up and running. Execute the following command and then visit the Raspberry Pi device using a browser (e.g. 192.168.0.109).

sudo service apache2 start

Now you should be greeted with the popular and familiar “It works!” greeting.

Configuring the rest of it

Now, let us create the users boat and tiger.

sudo useradd -m -U -d /home/boat boat
sudo useradd -m -U -d /home/tiger tiger
sudo passwd boat
sudo passwd tiger

Let us now configure the directory for our Blosxom blog and get it ready. For simplicity, I suggest we make this directory to be owned by the boat user.

sudo mkdir /var/www/LifeOfPi
sudo chown -R boat.boat /var/www/LifeOfPi

Once you reach this point, lets install and configure the blogging software – Blosxom. Blosxom is downloadable from here. You must download the file to your desktop and then copy it to the Raspberry Pi (using SCP is what I recommend.)

Assuming that the file (with .tar.gz extension is downloaded and copied over to the home directory of the boat user, you can extract it and copy it over to the apache directory.

Let us start with becoming the boat user. For the rest of the tutorial, the commands are executed with the id of the boat user.

sudo su - boat

Extract the software and copy it over to the web server’s directory.

tar xzf blosxom-2.1.2.tar.gz 
cp blosxom-2.1.2/blosxom.cgi /var/www/LifeOfPi/index.cgi

Now view the file /var/www/LifeOfPi/index.cgi and make the following two changes (if you prefer, you can change more parameters and the code offers decent explanation of each of the parameters):

# What's this blog's title?
$blog_title = "Life Of This Pi";
# Where are this blog's entries kept?
$datadir = "/home/boat/blosxom/data/";

Now, create the directories for  scripts and data.

mkdir /home/boat/blosxom/data
mkdir /home/boat/scripts/

Create the script that collects sample data and dumps to the file. The script is created with the name /home/boat/scripts/whatismylife.sh

#!/bin/sh

myts=`date +%y-%m-%d-%H-%M-%S`
myfile="/home/boat/blosxom/data/post-${myts}.txt"
mydate=`date`
mypi=`who | grep "^pi" `
mynpi=`who | grep "^pi" | wc -l `
mytiger=`who | grep "^tiger" `
myntiger=`who | grep "^tiger" | wc -l `
myuptime=`uptime`

echo "What the boat says at [$mydate]\n" >> $myfile
echo "At [$mydate], I have $mynpi Pi-s and $myntiger Tiger-s.\n<br>" >> $myfile
echo "<br>At that very minute, my sailing status looks like this: \n<pre>\n" >> $myfile
echo "$myuptime" >> $myfile
echo "\n</pre>\nPi-s on the system: \n<pre>\n" >> $myfile
echo "[\n$mypi\n]" >> $myfile
echo "\n</pre>\nTiger-s on the system: \n<pre>\n" >> $myfile
echo "[\n$mytiger\n]" >> $myfile
echo "\n</pre>\n" >> $myfile

Make the script executable

chmod +x /home/boat/scripts/whatismylife.sh

For the boat user, add a crontab entry that looks like the following line, so that the script gets executed every 10 minutes.

*/10 * * * * /home/boat/scripts/whatismylife.sh

To start with, execute the script once manually.

/home/boat/scripts/whatismylife.sh

Now, you can see the blog running on your Raspberry Pi device by visiting the URL of the blog (if your Raspberry Pi’s IP address is 192.168.0.109, then the url would be http://192.168.0.109/LifeOfPi/ ).
Here is a sample screenshot from my Raspberry Pi running Blosxom.

RPi Screenshot

Hope you liked this tutorial and your Raspberry Pi. Happy Baking!

Pi: Ready To Serve

02 Sep

I got hooked onto Raspberry Pi in recent weeks. Here are a few factors that contributed to this fanciness towards the device

  • Simplicity of the device
  • Ability to compile accessories from existing gear
  • Potential of the device to serve to a wide range of use cases
  • Ability to start simple and then dig deeper
  • Potential in Education
  • Low cost

As discussed in some of my tweets, the device I got a few months ago has been successfully running a blogging software that is used to test the resilience of the system while running automated tasks and a web server stack. More details on the stack later.

After being thoroughly impressed with the device, I ordered (from element14) a bunch of devices as spares and giveaways. Finally I got my hands on these devices and managed some time to unpack these.


Pi-Ready-2013-09


I am compiling a series of notes to get these devices up and running. These notes help me in distributing these devices effectively and make them useful for the target audience. As a first batch, these devices are most likely to go to educational institutions that I frequently visit as a guest faculty.


Moving to Twenty Thirteen Theme

17 Aug

I was using Graphene theme of WordPress for quite some time. The biggest takeaways from the theme are extreme customization (font families, headers, footers, analytics), sliders, nice graphics and more. In the last few days, I started tilting more towards simple themes that would offer very simple layout and page views. So I started playing with multiple themes and finally zeroed in on Twenty Thirteen. Customized my header image and added a few widgets. Changed a few fonts and colors to make all the components gel well. Finally, added analytics code to the .php files. I am all set now to use the new theme for a few weeks.

Now that I am using a simplified layout, I am continuing my search for themes that offer simple sliders along with very simple main column. Suggestions are welcome.

Obituary – Atul Chitnis

03 Jun

Atul Chitnis is no more.

That comes as a sad news for not only me, but also for the entire open source community in India and worldwide. Atul founded and ran foss.in with passion. Beyond foss.in, he is the go to guy for many hacks to make opensource software work. During the initial days of my return to India, I used to take good amount of hints from his posts on how to hack the unix/linux based systems to work with several internet service providers in India. I know several students who are heavily influenced by Atul during their college days and chose opensource as the foundation of their careers. More about Atul on Wikipedia.

Quoting from one of his blog posts earlier this year:

Dilon mein tum apni
Betaabiyan leke chal rahe ho
Toh zinda ho tum

Nazar mein khwabon ki
Bijliyaan leke chal rahe ho
Toh zinda ho tum

He remains alive in our hearts. May his soul rest in peace.

Bind, linux and resilience

11 Mar

Last month was a pleasant milestone for one of the servers I manage – the server is up for more than 1000 days and actively serving public DNS queries.

$ uptime
 19:52:37 up 1013 days,  2:44,  2 users,  load average: 0.00, 0.00, 0.00
$

The configurations on the device change on a weekly basis, the server serves a few thousand queries every hour. The queries served cover few tens of domains and reverse pointers for large IP blocks.

Given the amount of activity and the dynamism involved, this uptime shows the stability and resilience of the bind program and the underlying Ubuntu linux.

Despite being fully satisfied with bind, the latest one I am getting fascinated by is tiny-dns. Key take-aways from tiny-dns include ability to cache queries and being able to serve PTR/A records off the same configuration lines. Segmenting the responses based on originating (source) IP block is also quite simple in tiny-dns.

Hope to bring up a few production systems in tiny-dns to ensure that we have a choice.